Appium Testing: The Complete Guide to Mobile Automation

Sam Atkinson is a results-driven SEO Executive with 3 Years of experience in optimizing digital visibility and driving organic growth. Skilled in developing and executing strategic SEO initiatives, Sam excels in keyword research, technical audits, and competitor analysis to elevate online presence and improve search engine rankings. With a keen eye for detail and a passion for delivering measurable results, Sam collaborates cross-functionally to align SEO efforts with business objectives and enhance website performance. Committed to staying ahead of industry trends.
Mobile applications need to work across different devices, operating systems, and screen sizes. Testing every feature manually becomes difficult as applications grow and release cycles get shorter. Even a small change to a login screen, checkout process, or navigation menu can introduce issues that affect users.
This is where Appium testing helps.
Appium allows teams to automate mobile application testing on Android and iOS devices. Instead of manually repeating the same actions for every release, testers can write scripts that launch an application, interact with its interface, and check whether it behaves as expected.
Appium also supports multiple programming languages, making it easier for teams to work with their existing development and testing tools.
This guide covers everything from Appium's architecture and installation to writing automated tests, handling gestures, running parallel tests, and integrating Appium into CI/CD pipelines. It also explains what changed in Appium 3 and how to make mobile automation tests more reliable.
What Is Appium Testing?
Appium is an open-source automation framework used to test mobile applications across different platforms. It allows testers to automate user interactions such as tapping buttons, entering text, scrolling through screens, and navigating between application pages. Appium primarily uses the W3C WebDriver protocol to communicate between test scripts and mobile devices. It supports automation on real devices, Android emulators, and iOS simulators. One of Appium's main advantages is that it supports several programming languages, including:
Java
Python
JavaScript
C#
Ruby
Teams can choose a language that fits their existing test automation setup instead of learning a completely new programming language.
Types of applications supported by Appium
Appium supports three main types of mobile applications.
1. Native applications These applications are built specifically for an operating system, such as Android or iOS. For example, an Android banking application may use native Android interface components, while its iOS version uses native iOS components. Appium can automate these applications through platform-specific drivers.
2. Hybrid applications Hybrid applications combine native application components with web content displayed inside a WebView. Appium can interact with the native parts of the application and, when supported and configured, switch to the WebView context to automate web elements.
3. Mobile web applications These applications run in mobile browsers such as Chrome on Android or Safari on iOS. Appium can automate browser interactions, including opening web pages, entering information, and validating navigation. Appium also has drivers for other platforms, although support depends on the available driver and its capabilities.
Why Teams Choose Appium as Their Mobile Testing Tool
There are several reasons teams use Appium for mobile automation testing.
1. Support for Android and iOS Appium provides a common automation approach for both platforms. Teams can use similar test structures and testing practices across Android and iOS, although platform-specific capabilities and element locators may differ. This is useful for applications that offer similar functionality on both operating systems.
2. Freedom to choose a programming language Appium works with WebDriver-compatible client libraries. Teams can write tests in familiar languages without having to adopt an entirely new testing language.
3. Testing on real devices and virtual devices Appium supports Android emulators, iOS simulators, and physical mobile devices. Emulators and simulators are useful during development, while real devices help teams validate application behavior on actual hardware.
4. No need to modify the application for standard UI automation Appium generally automates applications through the automation interfaces provided by the operating system. This means teams can test application builds without adding Appium-specific automation code to the application.
5. Integration with existing automation workflows Appium tests can run with testing frameworks such as Pytest, JUnit, and TestNG. Teams can also integrate them into CI/CD pipelines to execute automated checks when code changes are introduced.
6. Open-source framework Appium is free to use and has an active open-source ecosystem of drivers, plugins, client libraries, and supporting tools. However, teams still need to account for the cost of devices, infrastructure, maintenance, and test execution. These capabilities make Appium a useful mobile testing tool for teams that need flexible, repeatable UI automation.
What Can You Automate with Appium?
Appium is primarily designed for automating application interactions through the user interface. Here are some common scenarios where it can help.
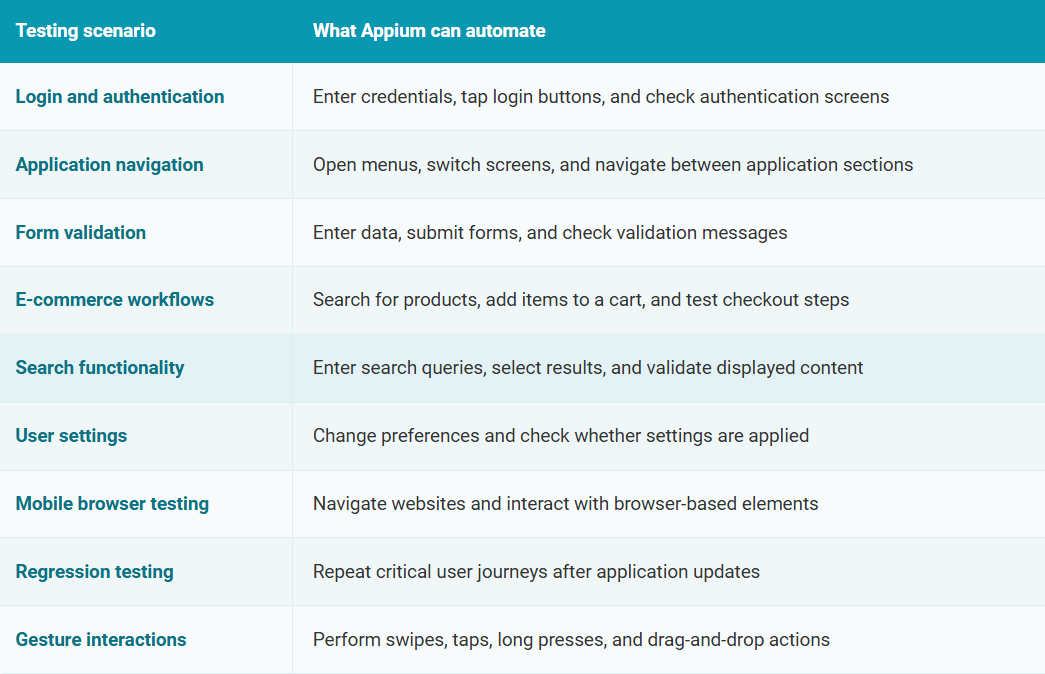
For example, an e-commerce team could automate the following purchase journey:
Launch the application.
Log in with a test account.
Search for a product.
Open its product page.
Add the product to the cart.
Proceed to checkout.
Verify that the expected checkout screen appears.
The same test can be repeated across supported device configurations. Some interactions involving system permissions, notifications, or hardware features may also be automated, depending on the platform and driver. Appium should not, however, be treated as a replacement for every type of mobile testing. Specialized performance, security, backend, and accessibility testing may require additional tools.
How Appium Works: Architecture
Appium follows a client-server architecture. This separates the code that defines the test from the software responsible for interacting with the mobile device. The main components are:
1. Appium client The client is the test script written in a programming language such as Python or Java. It sends commands to the Appium server through a WebDriver-compatible client library. For example, a script might instruct Appium to locate a login button and tap it.
2. Appium server The Appium server receives commands from the client and routes them to the appropriate automation driver. The server runs on Node.js and manages communication between test scripts and installed drivers.
3. Appium driver The driver connects Appium to the automation technology available on the target platform. For example: UiAutomator2: Automates Android applications. XCUITest: Automates iOS applications through Apple's XCTest automation infrastructure.
The driver handles the platform-specific implementation of the commands.
4. Mobile device The test runs against an application on a physical device, emulator, or simulator. The automation driver performs the requested action and returns the result through the Appium server.
How commands move through Appium
Consider a test that taps a login button.
The test script sends a command to find the login button.
The Appium server receives the request.
The server passes the request to the selected driver.
The driver interacts with the application on the device.
The result returns to the test script.
The same general process applies to entering text, finding elements, taking screenshots, and performing other supported actions. This architecture allows Appium to support different platforms without requiring a completely separate automation framework for each one.
Appium 1 vs Appium 2 vs Appium 3: What Changed
Appium has gone through several major updates. Understanding the differences is important because older tutorials may contain installation instructions and commands that no longer work.
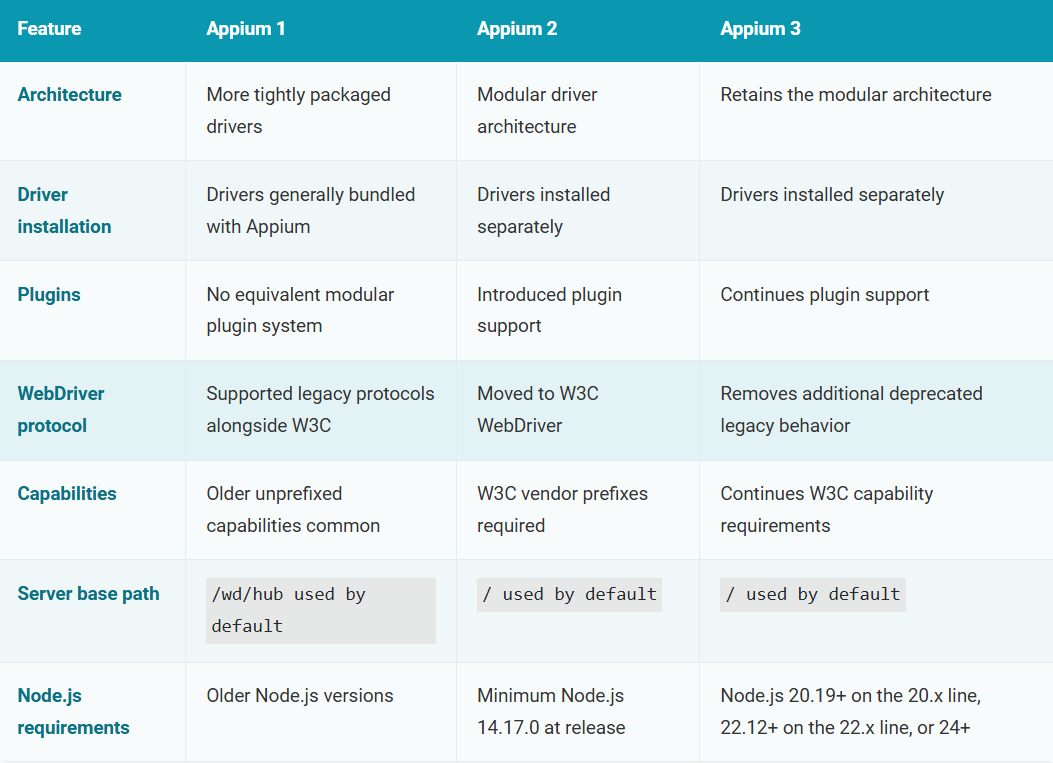
What changed in Appium 2?
Appium 2 introduced the largest architectural changes. Instead of including platform drivers as part of the main installation, it allowed users to install and manage drivers separately. For example, Android automation requires installing the UiAutomator2 driver: appium driver install uiautomator2 Appium 2 also introduced a plugin system, allowing additional functionality to be installed independently. Another important change was the requirement for vendor-prefixed capabilities. For example:
{ "platformName": "Android", "appium:automationName": "UiAutomator2", "appium:deviceName": "Android" }
The appium: prefix identifies capabilities that are specific to Appium rather than standard W3C WebDriver capabilities.
What changed in Appium 3?
Appium 3 builds on the architecture introduced in Appium 2 rather than replacing it. Its main changes include:
Updated dependencies: Appium 3 requires supported Node.js versions beginning with 20.19.0 and npm 10 or later.
Removal of deprecated endpoints: Older commands and endpoints that were previously supported for compatibility have been removed.
Stricter security flag handling: Insecure features enabled through --allow-insecure must use a scope prefix.
Changes to session discovery: The old /sessions endpoint has been replaced with /appium/sessions, which requires the relevant security feature flag.
Inspector integration: Appium Inspector can be installed as a plugin and hosted through the Appium server.
For example, enabling the Android ADB shell feature in Appium 3 uses a driver-scoped flag:
appium - allow-insecure=uiautomator2:adb_shell Teams upgrading from Appium 2 should review their client libraries, driver versions, server configuration, and any deprecated commands before migrating. For the complete list of changes, refer to the official Appium 3 migration guide.
Appium Drivers and Plugins
Appium uses drivers and plugins to extend its functionality. Although both are installed separately from the core server, they serve different purposes. Appium drivers
Drivers are responsible for automating specific platforms.
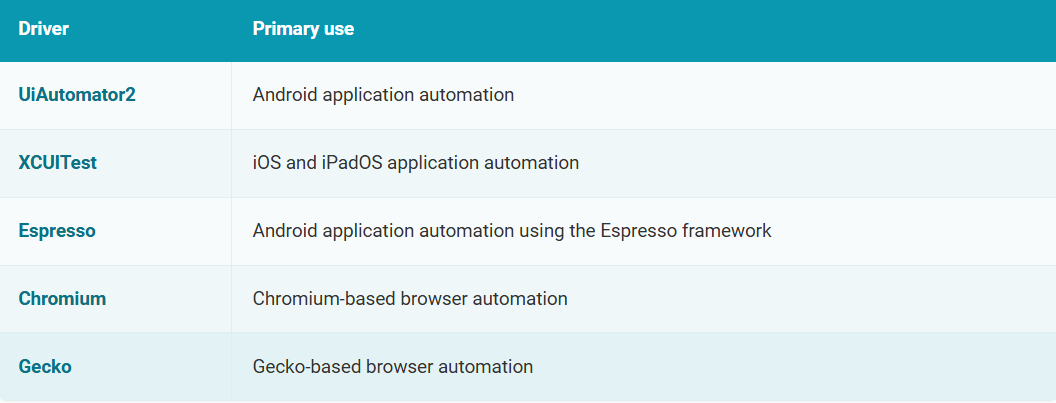
For example, to install drivers for Android and iOS:
appium driver install uiautomator2
appium driver install xcuitest
The XCUITest driver requires a suitable macOS and Xcode environment for local iOS automation.
To see which drivers are installed: appium driver list - installed
Appium plugins
Plugins add or modify capabilities without requiring changes to Appium's core server. Some examples include:
Images plugin: Adds image matching and comparison functionality.
Execute Driver plugin: Supports executing batches of commands through a server-side script.
Inspector plugin: Makes Appium Inspector available through the Appium server.
Universal XML plugin: Provides a common XML representation for supported Android and iOS element hierarchies.
For example, install the Inspector plugin using: appium plugin install inspector Plugins generally need to be enabled when starting the server. For the Inspector plugin: appium - use-plugins=inspector Drivers are required for platform automation, while plugins are optional extensions.
Appium Testing Tutorial: Setup
This Appium testing tutorial uses Android and Python to demonstrate the installation process and the first automation test. The process for iOS is similar at a high level, but it requires different platform tools and drivers.
Step 1: Install the prerequisites
Before installing Appium, prepare the following: Node.js and npm Appium runs on Node.js. For Appium 3, use a supported Node.js release and npm 10 or later. Check the official requirements before selecting a version. Verify your installation: node -v npm -v Java Development Kit The Android automation setup requires a compatible Java Development Kit. Check whether Java is installed: java -version Android Studio and Android SDK Install Android Studio and the Android SDK components required for your target Android version. The Android setup also requires access to Android SDK Platform-Tools, including ADB. Configure the ANDROID_HOME environment variable to point to the Android SDK directory. Python Install a supported Python version to write and execute the test scripts in this tutorial. Step 2: Install Appium
Open a terminal and run: npm install -g appium Verify the installation: appium -v This installs the Appium server. You still need a suitable platform driver.
Step 3: Install the UiAutomator2 driver
For Android testing, run: appium driver install uiautomator2 Verify the driver prerequisites: appium driver doctor uiautomator2 This command checks the environment and reports missing requirements. You can also install a collection of mobile drivers and plugins using: appium setup mobile
The available installations depend on the operating system.
Step 4: Prepare an Android device
You can use either an Android emulator or a physical Android device. For an emulator:
Open Android Studio.
Open Device Manager.
Create an Android Virtual Device.
Choose a supported device configuration and system image.
Start the emulator.
For a physical device, enable Developer Options and USB debugging, connect the device, and authorize the computer when prompted. Check that ADB recognizes the device:
adb devices
The device should appear in the output with an authorized status.
Step 5: Install the Appium Python client
Run: python -m pip install Appium-Python-Client pytest
The Appium Python client provides methods for communicating with the server. Pytest will be used to execute the sample test.
Step 6: Start the Appium server
Open a separate terminal and run: appium By default, the server listens on port 4723. For modern Appium installations, the default local server URL is:
The older /wd/hub path is not required unless you have explicitly configured the server to use that base path. Keep the server running while executing tests.
What about iOS setup?
For local iOS automation, you need a macOS environment with a compatible Xcode installation. You must also install the XCUITest driver and configure the required simulator or physical-device setup. Real iOS devices may require additional signing, provisioning, and device trust configuration. Once the setup is complete, Appium can create sessions with the iOS device through the XCUITest driver.
Understanding Appium Capabilities
Capabilities define the environment and configuration Appium should use when starting a test session. They tell Appium which platform, automation driver, device, and application to use. For example, consider this Android configuration:
{ "platformName": "Android", "appium:automationName": "UiAutomator2", "appium:deviceName": "Android", "appium:appPackage": "com.android.settings", "appium:appActivity": ".Settings" }
The important capabilities are:
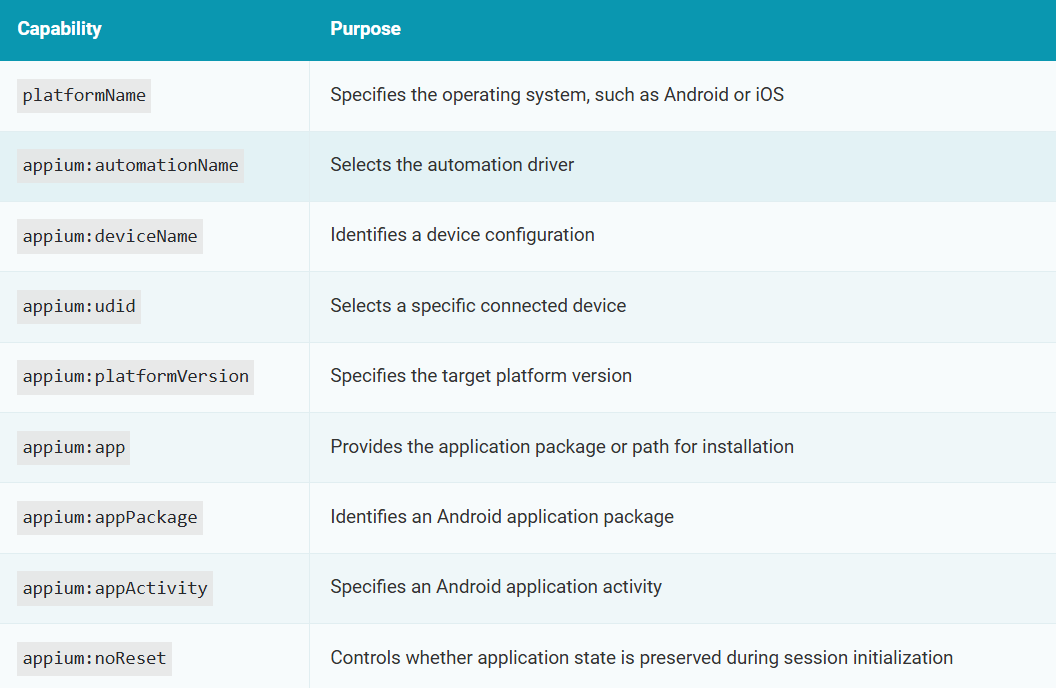
Not every capability applies to every driver. For example, Android-specific capabilities such as appPackageand appActivityare not used in the same way for iOS applications. For iOS, a session may use:
{ "platformName": "iOS", "appium:automationName": "XCUITest", "appium:deviceName": "iPhone Simulator", "appium:platformVersion": "YOUR_IOS_VERSION", "appium:bundleId": "com.example.app" }
The device name, platform version, and bundle identifier must match the available environment and application. For parallel execution or environments with several connected devices, use a unique device identifier rather than relying only on deviceName. Important: Capabilities are defined when a session starts. You cannot change the session's initial capabilities after it has been created.
Using Appium Inspector to Find Elements
Before writing an automation script, you need a way to identify the elements you want to interact with. For example, a login screen might contain a username field, password field, and login button. Appium Inspector helps you inspect these elements and find suitable locators.
What is Appium Inspector?
Appium Inspector is a graphical tool that allows testers to view application screens, inspect the UI hierarchy, examine element attributes, and try locator strategies. It is available as a standalone application and through the Appium Inspector plugin.
How to use Appium Inspector
Install and open Appium Inspector, or enable the Inspector plugin in the Appium server.
Enter the Appium server URL and required session capabilities.
Start an inspection session.
Select an element in the application screenshot or hierarchy.
Review its available attributes and locator options.
For example, a login button might have an accessibility identifier such as:
login-button
You could then locate it in a Python test using:
driver.find_element( AppiumBy.ACCESSIBILITY_ID, "login-button" ) This is an illustrative identifier. The actual value must come from the application being tested.
What to check while inspecting elements
Pay particular attention to:
Accessibility identifiers
Resource IDs on Android
Element type or class
Visible text or labels
Whether the element is enabled or displayed
Whether the same identifier remains stable across screens and application builds
Choosing the right locator early can prevent many test maintenance issues later.
How to Write Your First Appium Automation Test
Now that Appium is installed, you can write a basic Python test. This example uses the Android Settings application, so you do not need to build a separate app. The test will:
Create an Appium session.
Open Android Settings.
Find the Apps option.
Tap it.
Check whether the displayed UI changes.
Close the session.
Step 1: Create a Python file
Create a file named:
test_settings.py
Step 2: Add the test code
**_import pytest from appium import webdriver from appium.options.android import UiAutomator2Options from appium.webdriver.common.appiumby import AppiumBy from selenium.webdriver.support.ui import WebDriverWait from selenium.webdriver.support import expected_conditions as EC
@pytest.fixture def driver(): options = UiAutomator2Options().load_capabilities({ "platformName": "Android", "appium:automationName": "UiAutomator2", "appium:deviceName": "Android", "appium:appPackage": "com.android.settings", "appium:appActivity": ".Settings", "appium:language": "en", "appium:locale": "US" }) session = webdriver.Remote( "http://127.0.0.1:4723", options=options ) yield session session.quit()
def test_open_apps_settings(driver): apps = WebDriverWait(driver, 20).until( EC.element_to_be_clickable( (AppiumBy.XPATH, '//*[@text="Apps"]') ) ) assert apps.is_displayed() initial_screen = driver.page_source apps.click() WebDriverWait(driver, 10).until( lambda d: d.page_source != initial_screen )_**
Step 3: Run the test
Ensure that the Android device or emulator is running and that the Appium server is active. Execute: pytest -v test_settings.py Pytest will start the test, create an Appium session, and execute the commands.
Step 4: Understand the code
UiAutomator2Options Defines the configuration for Android automation. webdriver.Remote() Connects the Python script to the Appium server and creates a session. WebDriverWait() Waits for a specified condition instead of immediately attempting an interaction. AppiumBy.XPATH Locates an element using an XPath expression. apps.click() Taps the selected element. driver.quit() Ends the session and releases its resources. This example demonstrates a basic interaction. It checks that the target element is available and that the UI changes after tapping it. The Settings interface varies between Android versions and device manufacturers. If the Apps option has a different label or location, inspect the screen and update the locator. For a production application, tests should also verify a meaningful outcome, such as whether login succeeds, an order is created, or the correct information appears.
Appium Locator Strategies
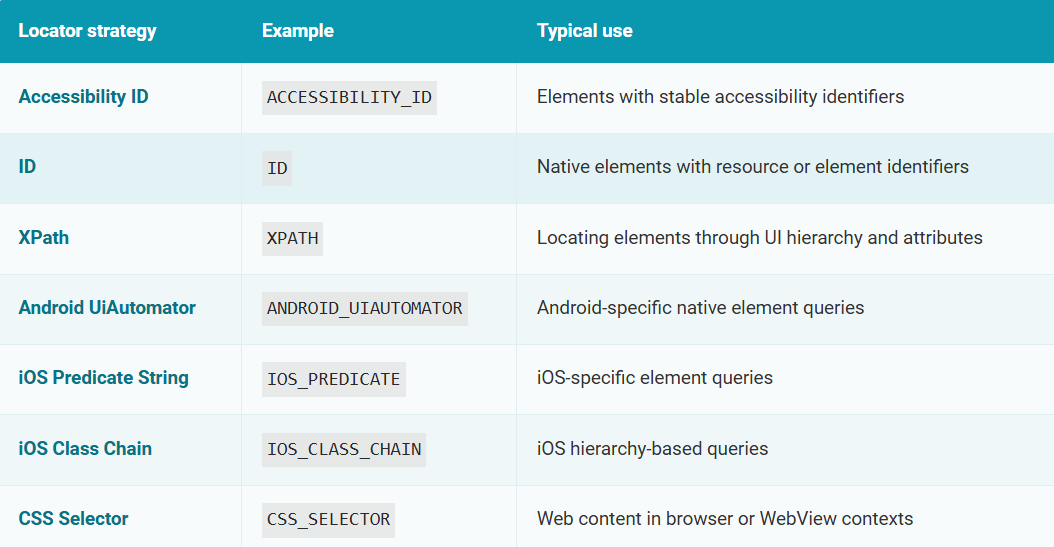
Locators tell Appium how to find elements on the application screen. A reliable locator should identify the intended element without depending heavily on the surrounding UI structure.
Common Appium locators
1. Accessibility ID
Accessibility IDs are often a good starting point because they can provide stable, readable element identifiers. driver.find_element( AppiumBy.ACCESSIBILITY_ID, "login-button" )
2. ID
On Android, resource IDs can identify application elements. driver.find_element( AppiumBy.ID, "com.example.app:id/login_button" )
3. XPath
XPath allows elements to be located using attributes and hierarchy information. driver.find_element( AppiumBy.XPATH, '//*[@text="Login"]' ) XPath is useful when suitable identifiers are unavailable, but complex hierarchy-dependent XPath expressions can be slower and more fragile.
4. Android UiAutomator
Android-specific queries can locate elements using native UI attributes. driver.find_element( AppiumBy.ANDROID_UIAUTOMATOR, 'new UiSelector().text("Login")' ) This example uses the UiSelector API supported by relevant UiAutomator2 driver versions. Check driver compatibility when using platform-specific locator APIs.
5. iOS Predicate String
On iOS, predicate expressions can locate elements using attributes such as labels and names.
driver.find_element( AppiumBy.IOS_PREDICATE, 'label == "Login"' )
Which locator should you choose?
Prefer stable accessibility identifiers or native element IDs when they are available. Use platform-specific locators when necessary, and reserve complex XPath expressions for situations where more reliable alternatives are unavailable. For native application automation, CSS selectors generally do not apply. They are used when automating web content through the appropriate browser or WebView context.
Handling Waits and Synchronization
Mobile applications do not always respond immediately. A screen may need time to load, a network request may be delayed, or an animation may need to finish before an element becomes available. If an automation script tries to interact with an element too early, the test may fail even though the application works correctly. Waits help avoid this problem. Implicit waits
An implicit wait tells the driver how long to keep trying to find an element before reporting that it cannot be found.
driver.implicitly_wait(10)
This sets an implicit wait of up to ten seconds for element searches. Implicit waits apply broadly, so they do not express the precise state an individual test needs.
Explicit waits
Explicit waits pause execution until a particular condition is satisfied or a timeout is reached. For example:
from selenium.webdriver.support.ui import WebDriverWait from selenium.webdriver.support import expected_conditions as EC login_button = WebDriverWait(driver, 15).until( EC.element_to_be_clickable( (AppiumBy.ACCESSIBILITY_ID, "login-button") ) ) login_button.click() This waits until the login button is ready for interaction.
Why fixed delays cause problems
A common approach is to insert a fixed delay: import time time.sleep(10) However, this makes the test wait ten seconds regardless of how quickly the application responds. If the screen loads in two seconds, the remaining eight seconds are wasted. If it takes longer than ten seconds, the test can still fail. Best practice: Prefer explicit waits tied to the expected application state. Avoid combining implicit and explicit waits unnecessarily, as doing so can produce confusing timeout behavior.
Gestures with W3C Actions
Mobile applications depend on touch gestures such as swiping, dragging, and long pressing. Modern Appium clients support W3C Actions for performing these interactions. Older APIs such as TouchAction and MultiAction have been removed from recent versions of the Appium Python client.
Example: Performing a swipe in Python
The following example performs a vertical swipe using a touch pointer. from selenium.webdriver import ActionChains from selenium.webdriver.common.actions import interaction from selenium.webdriver.common.actions.action_builder import ActionBuilder from selenium.webdriver.common.actions.pointer_input import PointerInput actions = ActionChains(driver) actions.w3c_actions = ActionBuilder( driver, mouse=PointerInput(interaction.POINTER_TOUCH, "finger") ) finger = actions.w3c_actions.pointer_action finger.move_to_location(300, 800) finger.pointer_down() finger.pause(0.2) finger.move_to_location(300, 300) finger.release() actions.perform() How the gesture works
Move the virtual finger to the starting coordinates.
Press down on the screen.
Hold briefly.
Move to the ending coordinates.
Release the finger.
Execute the complete action sequence.
The example uses fixed coordinates for demonstration. Production tests should calculate gesture positions from the screen dimensions or relevant element locations so that gestures work across different devices. Other supported gestures can be created through W3C Actions or driver-specific mobile commands. Use the mechanism recommended by the installed driver and client version.
Running Appium Tests in Parallel
Running tests sequentially becomes time-consuming as automation suites grow. Suppose a team needs to execute 100 test cases across several Android and iOS devices. Running every test on one device creates a long execution queue. Parallel testing allows independent tests to execute simultaneously on different devices or simulators.
How parallel testing works
Appium can manage multiple sessions, provided the drivers, devices, and infrastructure support them. Each parallel session needs a properly configured target device. Certain driver-specific ports and resources must also be unique.
Android parallel testing For UiAutomator2, important capabilities include: appium:udid: Identifies the specific device. appium:systemPort: Defines the port used by the UiAutomator2 server. appium:chromedriverPort: May be required when running web or hybrid application tests in parallel.
An example configuration is:
{ "platformName": "Android", "appium:automationName": "UiAutomator2", "appium:udid": "DEVICE_ID_1", "appium:systemPort": 8201 }
Another session would use a different device identifier and system port.
iOS parallel testing For XCUITest, parallel sessions require separate devices or simulators. Important settings may include: appium:udid appium:wdaLocalPort appium:derivedDataPath
Unique configurations help prevent WebDriverAgent and resource conflicts.
Best practices for parallel execution
Assign a unique device to each concurrent session.
Configure separate driver ports where required.
Avoid sharing application data or test accounts between tests that modify the same records.
Ensure tests can execute independently.
Monitor device availability and infrastructure capacity.
Capture results separately for each test session.
Parallel testing can reduce overall suite execution time, but the benefit depends on the number of available devices, test independence, and infrastructure capacity.
Appium Automation in CI/CD
Appium automation becomes more useful when tests run automatically during the software delivery process. Instead of waiting for testers to manually start a regression suite, teams can configure tests to run after selected builds or code changes. How Appium fits into CI/CD
A typical workflow looks like this:
A developer commits code.
The CI system builds the application.
The build is made available to the testing environment.
The pipeline starts or connects to an Appium server.
Appium tests run against the selected devices.
The testing framework collects results and reports failures.
The pipeline applies the configured quality checks before release.
Tools commonly used with Appium
Appium tests can be orchestrated through systems such as Jenkins, GitHub Actions, GitLab CI/CD, and other automation platforms. The CI system does not replace Appium. It starts and manages the test execution process. Example: Running a Python test suite
Once the Appium server, device, application, and client dependencies are available, the pipeline can execute:
pytest tests/ -v - junitxml=reports/results.xml
This runs the tests and creates a JUnit-compatible XML report. The CI system can collect the report and display the test results. Practical considerations
A successful CI/CD setup needs more than an Appium installation. Teams must also manage:
Availability of physical devices or virtual devices
Appium server and driver compatibility
Application build installation
Test account credentials
Device cleanup between executions
Collection of screenshots, logs, and reports
Handling failed sessions and infrastructure errors
For iOS automation, the execution environment must also support the required Apple tooling. Start by automating a small set of important user journeys. Expand the pipeline after the execution environment and tests become reliable.
Reducing Flaky Appium Tests
A flaky test produces inconsistent results even when the application code has not changed. For example, a login test might pass several times, fail once because a screen loads slowly, and pass again when rerun. These failures reduce confidence in automated testing.
Real devices vs. emulators: Comparison causes of flaky tests
1. Unstable locators An element locator may depend on text or UI hierarchy that changes between application versions. 2. Incorrect synchronization The test may attempt an action before the element or screen is ready. 3. Shared test data Parallel tests may interfere with one another when they use the same accounts or modify the same records. 4. Device state differences Permissions, keyboard state, application data, and device configuration can change test behavior. 5. Animations and transitions A test may interact with an element while the application is still transitioning between screens. 6. Network dependencies A test that relies on an external service may fail when the service responds slowly or becomes unavailable.
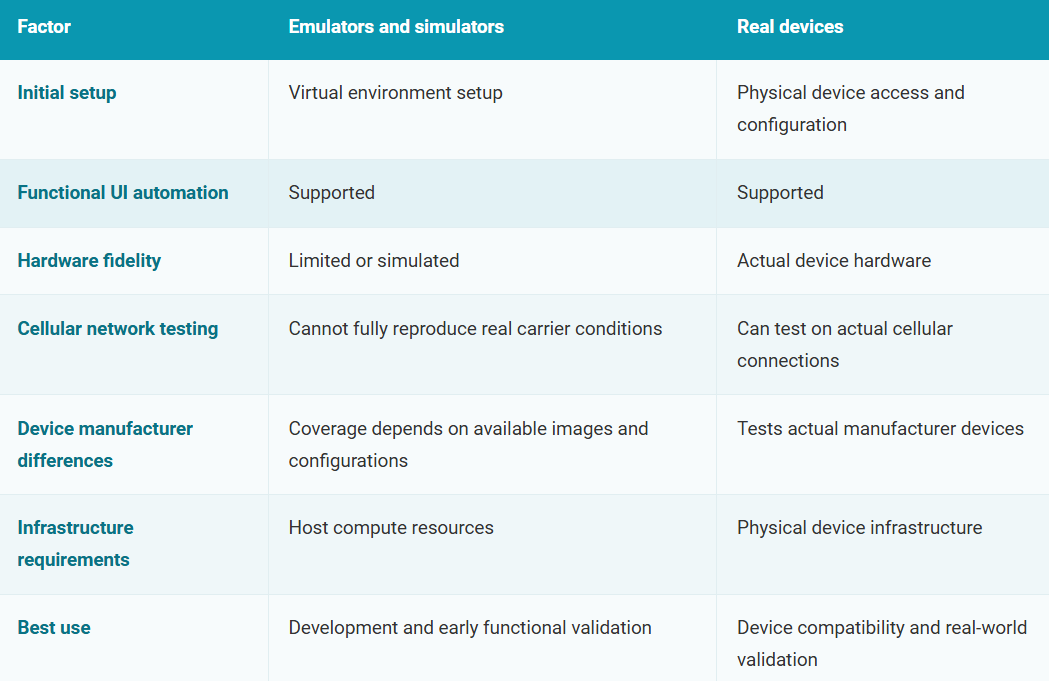
Real devices vs. emulators: Comparison
Which should you use?
A practical strategy is to combine both. Use emulators and simulators for early feedback and frequent automation runs. Use real devices to validate important application journeys across the hardware, OS versions, and network conditions relevant to your users. This approach provides broader coverage without requiring every test to run on physical hardware.
Performance Testing with Appium and HeadSpin
Appium is primarily a UI automation framework. It can automate user journeys, but it does not independently provide comprehensive application, device, and network performance analysis.
HeadSpin extends Appium testing by allowing teams to run existing Appium scripts on real devices while collecting performance data through its platform.
HeadSpin supports Appium automation across real devices and networks. Its performance capabilities include session recordings, application and device KPIs, network data, and tools for investigating performance issues. This allows teams to examine how an application behaves during automated user journeys and investigate performance problems alongside functional test results. Performance data and analysis capabilities depend on the HeadSpin product and configuration being used.
Troubleshooting Common Appium Errors
Even with the correct setup, Appium tests can fail because of configuration issues, device problems, or application behavior. The following table covers common errors and what to check first.
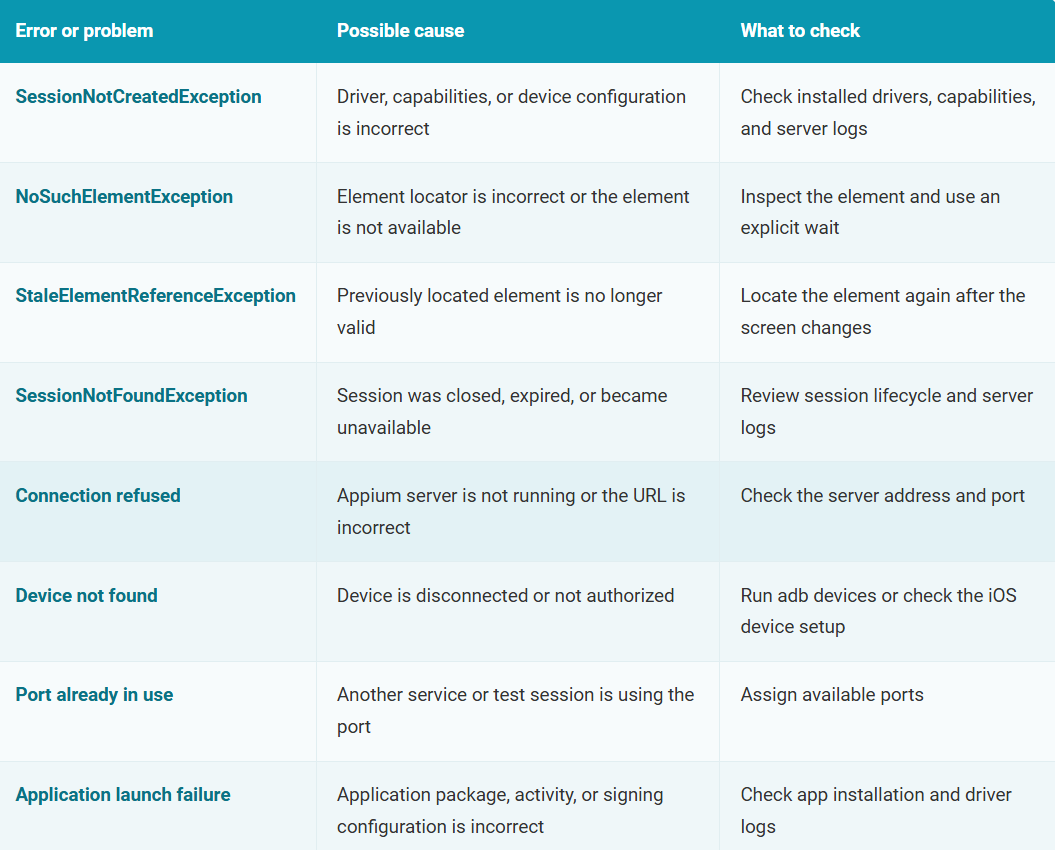
1. SessionNotCreatedException This error commonly appears when Appium cannot initialize the requested session. Check whether the required driver is installed: appium driver list - installed Also verify that the device is available and the capabilities match the target environment.
2. NoSuchElementException This occurs when Appium cannot find the element using the provided locator. Possible reasons include an incorrect identifier, a screen that has not loaded, or an element that is not present in the current context. Use Appium Inspector to verify the locator and wait for the expected element before interacting with it.
3. Connection errors If the client cannot communicate with Appium, confirm that the server is running. For a standard local setup, use: http://127.0.0.1:4723 Check whether your script is using an older /wd/hub URL that does not match the server configuration.
4. Android device authorization issues For physical Android devices, run: adb devices If the device is unauthorized, check the USB debugging authorization prompt on the device.
5. iOS WebDriverAgent issues XCUITest automation depends on WebDriverAgent. Problems with Xcode compatibility, signing, provisioning, or device trust can prevent sessions from starting. Review the XCUITest driver logs and verify the required iOS setup.
6. Hybrid application issues If a test cannot locate an element inside a WebView, check whether Appium is using the correct context. Native and web elements may require different locator strategies. A useful debugging approach is to examine the available contexts: print(driver.contexts) Switching to an available WebView context may be necessary before using web locators. Troubleshooting tip: Start with the Appium server logs, then examine the device state and application behavior. Not every automation failure is an application defect.
Appium vs Selenium (and vs Espresso/XCUITest)
Appium, Selenium, Espresso, and XCUITest are all used for test automation, but they differ in their target environments and capabilities.
1. Appium vs Selenium
Selenium primarily automates web browsers. Appium builds on WebDriver concepts to automate mobile applications and supported mobile browsers. The two frameworks share several familiar concepts, including element locators, WebDriver commands, and test assertions. However, Appium adds mobile-specific capabilities and platform drivers.
2. Appium vs Espresso
Espresso is an Android UI testing framework. It is closely integrated with Android's testing ecosystem and is commonly used by Android development teams. Appium, on the other hand, supports automation through several platform drivers and can be used with external test scripts. Appium also provides an Espresso driver, allowing it to work with the Espresso automation backend for supported use cases.
3. Appium vs XCUITest
XCUITest is Apple's UI testing framework for iOS applications. It works within Apple's development and testing ecosystem. Appium uses the XCUITest driver to automate iOS applications through a WebDriver-compatible interface.
Comparison
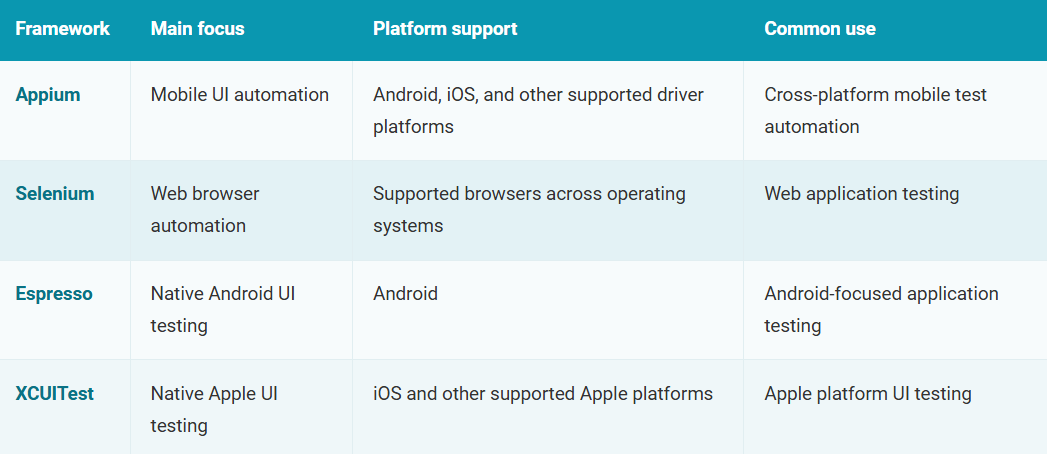
Which should you choose?
Use Selenium when the primary requirement is browser automation. Appium is a suitable choice when a team needs a common approach to automating Android and iOS applications. Espresso and XCUITest are useful when teams prefer platform-native testing tools or require closer integration with their respective development environments. The right choice depends on the application, development stack, testing requirements, and team expertise.
Limitations and When Not to Use Appium
Appium is useful for mobile UI automation, but it is not the right tool for every testing task.
1. Appium is not a complete performance testing tool Appium can execute actions and measure the timing of certain operations, but comprehensive performance analysis requires additional instrumentation or specialized tools. For example, investigating CPU consumption, memory usage, network behavior, and rendering performance may require tools beyond Appium's core functionality.
2. UI automation is slower than many lower-level tests Appium tests interact with applications through device automation layers. This introduces overhead compared with unit tests and many direct API tests. Running thousands of UI-level tests may therefore be less efficient than dividing coverage across unit, integration, API, and UI testing.
3. Cross-platform support does not guarantee identical scripts Android and iOS applications may have different navigation patterns, element attributes, and system behaviors. Teams can reuse testing logic, but they may still need platform-specific locators and interactions.
4. Device infrastructure requires maintenance Running Appium locally requires maintaining drivers, SDKs, operating system tools, and devices. Real-device testing also introduces requirements such as device connectivity, provisioning, and availability.
5. Specialized testing may need other tools Appium should not be the only tool used for:
Load testing
Security testing
API-level validation
Detailed performance profiling
Comprehensive accessibility assessment
Unit and component testing
When is Appium a poor fit?
Appium may not be the best primary tool when a team only needs to test backend services, validate application logic without launching the UI, or perform high-volume performance and load testing. Use Appium where user interface interaction is important, and choose more specialized tools for testing requirements outside that scope.
Best Practices for Appium Automation Testing
Reliable Appium automation requires more than scripts that execute successfully on one device. The following practices help teams maintain tests as applications and testing requirements evolve.
1. Start with critical user journeys Begin with workflows that matter most to users and the business. These might include login, registration, product search, booking, payment, and account management. Avoid automating every small interaction before the most important workflows are covered.
2. Use stable element locators Prefer accessibility identifiers and reliable native IDs. Avoid relying on long XPath expressions tied closely to the screen hierarchy. When stable identifiers are unavailable, work with developers to make important elements easier to locate.
3. Keep tests independent Tests should not depend on another test completing first. Prepare the required application state and test data before execution, and clean up afterward when necessary. This makes it easier to run tests separately or in parallel.
4. Use explicit waits Wait for the application state required by the next action. Avoid fixed delays wherever possible.
5. Separate test logic from platform configuration Keep capabilities, device details, application paths, and environment-specific values outside the main test logic. This makes it easier to execute the same test scenarios across different environments.
6. Keep reusable actions in one place Common interactions such as login, navigation, and form entry should not be duplicated across numerous scripts. Use reusable helper methods or an appropriate design pattern, such as the Page Object Model, when it makes the test suite easier to maintain.
7. Test on relevant device configurations Choose devices based on actual product requirements and the devices your users rely on. Include the Android and iOS versions, device models, and screen configurations that matter to your application.
8. Review logs and screenshots after failures Capture enough information to understand why a test failed. Useful evidence can include:
Appium server logs
Device logs
Screenshots
Test assertions
Application version
Device and OS details
9. Manage Appium version compatibility Keep track of Appium server, driver, client library, and platform-tool versions.
Before upgrading, review release notes and validate the automation suite in a controlled environment.
10. Maintain tests as the application changes Automation scripts need updates when the application UI or user journey changes.
Review failing tests regularly, remove obsolete test cases, and update locators and assertions when necessary.
The goal of appium automation testing is not simply to execute more tests. It is to create a test suite that provides reliable feedback and helps teams identify genuine problems before release.
Originally Published: https://www.headspin.io/blog/appium-automation-testing-a-step-by-step-guide